4.15 - Process Capability Studies
Overview
A process capability study is a statistical tool that measures the variation within a process. Samples of the product are taken, measured and the variation compared with the design tolerance. This comparison is used to establish how “capable” the process is of producing the product.
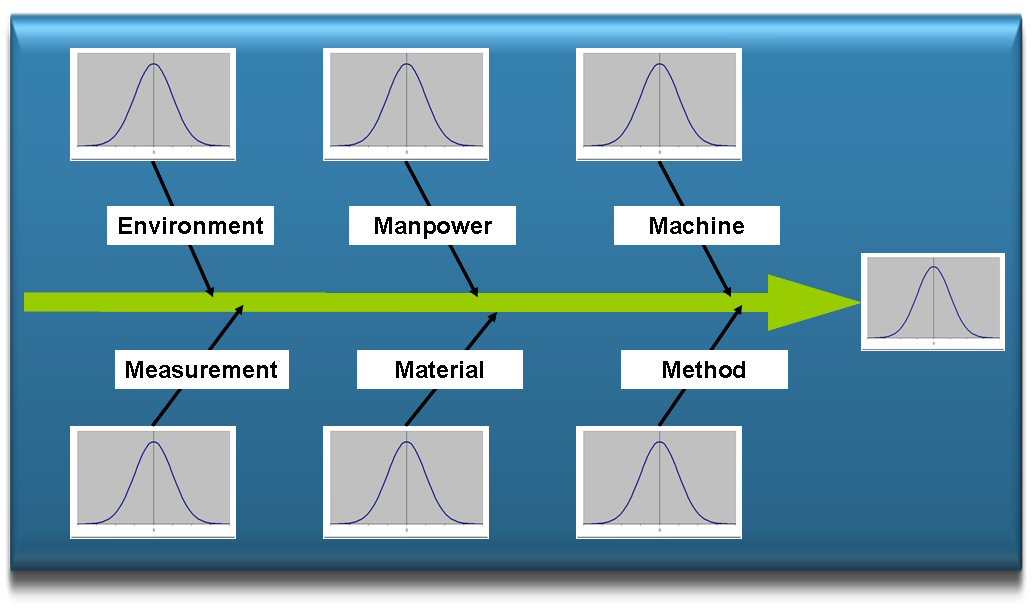
Process capability is attributable to a combination of the variability in all the inputs. Machine capability is calculated when the rest of the inputs are fixed. This means that process capability is NOT the same as machine capability. A capability study can be conducted on any one of the inputs by fixing the all the remaining ones.
All processes can be described by the diagram below. The distribution curves show the variability due to particular elements.

There are five occasions when the capability studies should be carried out, these are:-
- Before the machine / process is purchased (to see if it is capable of producing the components you require it to).
- When it is installed
- At regular intervals to check that the process is giving the performance required.
- If the operating conditions change (e.g. materials, lubricants etc)
- As part of a process capability improvement
The aim is to have a process where the product variability is sufficiently small that all the products are produced within tolerance.
There are two kinds of variability:
Inherent Variability - This due to the set of factors that are inherent in a machine / process by virtue of its design, construction and the nature of its operation, e.g. positional repeatability, machine rigidity, etc.
Assignable Variability - This is the variability for which specific causes can be identified. It can be eliminate or minimised through manufacturing engineering techniques like Process Capability Improvement (see guide 4.14
) e.g. tool wear, operator adjustments, state of coolant etc.
Process Capability Index, Cp
For a process to be capable of producing components to the specification, the sum of inherent and assignable variability must be less than the tolerance.
To measure capability carry out a Capability study and calculate a Capability Index (Cp) for the process. The process capability index is a means of quantifying the capability of the process to produce components within the tolerance of the design specification.
Cp = |
Tolerance / 6 x Standard Deviation |
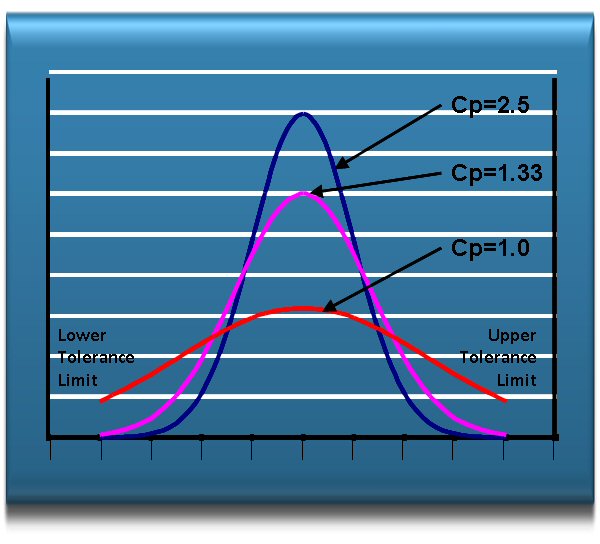
A value of Cp = 1.3 indicates that the distribution of the products covers 75% of the tolerance. This would be sufficient to assume that the process is capable of producing the part or part feature to the design specification.
Interpretation of machine / process capability index
Process Capability (Cp) Ranges |
Process Status Comments |
Less than 1.3 |
Process NOT capable |
Between 1.3 and 2.5 |
Process Capable |
Greater than 2.5> |
Perhaps the process should be used for something else? |
Where a process is producing a product with a capability index greater than Cp = 2.5 it should be noted that unnecessary precision is expensive. The graph below shows what process capability is in terms of the tolerance of a component:

The variability of the data does not always take the form of the normal “Bell Shaped” distribution curve. There can be “skewness” in the data and the resultant plots of the distribution curve. However, there are some simple statistical techniques available for overcoming this problem.
Notes
http://www.statisticalprocesscontrol.info/whatisspc.html